


 New Code Sent!

TYPES OF DRYER PLUGS: HOW TO REPLACE YOUR DRYER CORD
If you’ve noticed issues with your dryer, such as its failure to turn on, it may be time to replace your dryer plug. However, it’s important to make sure you get the right kind of cord. Electric dryers require cords suitable for 240-volt, 30-amp circuits while gas dryers simply use a 120-volt circuit cord and standard outlet. Dryer cords come in 3 and 4 prong variants, so always check the voltage to avoid getting the wrong kind.
Most new electric dryers don’t come with an electric cord because each home has unique requirements. If you’re installing a new dryer, you’ll need to purchase a cord separately. Remember, when dealing with electrical components, it’s always best to consult a professional for safe installation or repairs.

3-Prong vs. 4-Prong Dryer Cords
There’s a reason why there are different clothes dryer plug types. In the early 1990s, electric dryers used a 3-prong cord for a 240-volt circuit. Since then, homes built after 1996 are required to have a 4-prong dryer plug with a 240-volt, 30-amp circuit to reduce the risk of shock. The grounded, 4-prong plugs can also help keep your home up to code. If your house has 4-prong outlets and your appliance has a 3-prong dryer plug, adjustments will need to be made to meet the standard mandates for 4-prong power cords.
If you have questions or concerns regarding the electrical connections for your dryer, refer to your owner’s manual and consult a licensed electrician for assistance.
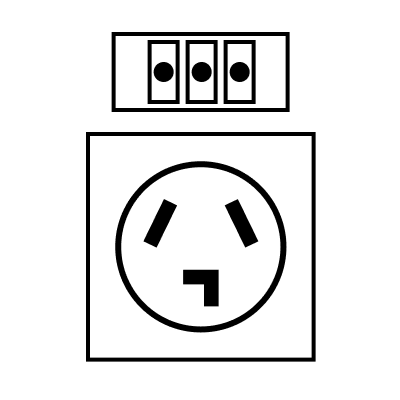
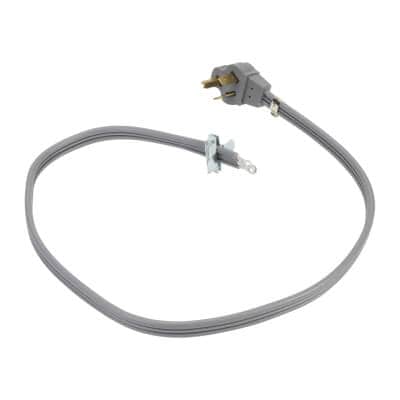
3-PRONG CORD AND OUTLET
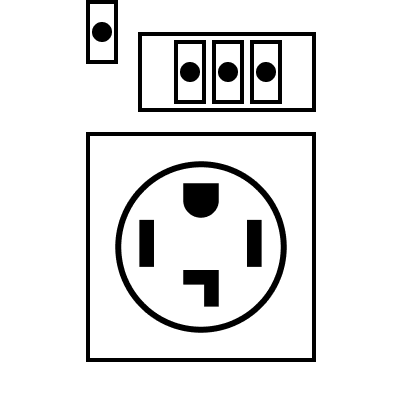
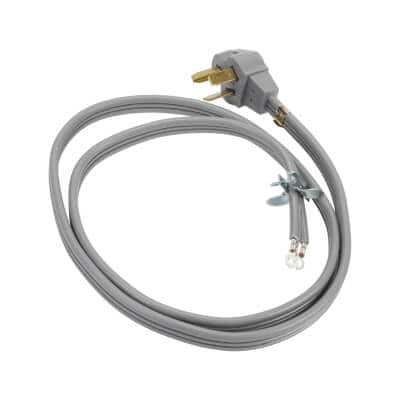
4-PRONG CORD AND OUTLET
DIFFERENCES BETWEEN 120 VS. 240 VOLT DRYER OUTLETS AND PLUGS
There’s a significant difference between a 120-volt outlet/plug and a 240-volt outlet/plug.
A standard 120-volt outlet/plug, often referred to as a standard 3-prong plug, is commonly found throughout homes and used for various electronics, lights, and some appliances. These outlets are smaller in size and accommodate the standard plugs found on most household items, including gas dryers.
On the other hand, a 240-volt outlet/plug is much larger than a standard plug and reserved for major appliances that require higher voltage, such as electric dryers.
FIND THE BEST DRYER FOR YOU
COMPARE GAS VS. ELECTRIC DRYERS
SHOP FOR MAYTAG® DRYER CORDS
INSTALLING OR REPLACING A DRYER CORD
HOW TO HOOK UP A 4-PRONG DRYER CORD IN 5 STEPs
To meet the standard regulations for houses built or remodeled after 1996, a 4-wire electrical connection is required for your electric dryer. Luckily, switching your dryer’s electrical connection to a 4-prong plug can be tackled in about an hour with a few tools and this general overview of the process. Read on to learn how to install a new 4-prong plug or change a 3-prong plug to a 4-prong cord.
When installing a new dryer or connecting a new cord, always refer to your dryer’s manual for specific instructions and electrical circuit requirements. If you do not have experience working with electrical wiring or if you have any doubts, consult a licensed electrician for questions and concerns.
TOOLS AND SUPPLIES NEEDED
TOOLS:
Screwdriver
Socket wrench
Pliers
SUPPLIES:
- 30-amp, 4-prong power cord.

Step 1: Remove the Cover Plate
Unplug your dryer from the power source.
Using a screwdriver, remove the plate housing the electrical wires. The plate will likely be above the power cord in the back of the appliance.
Opt for a magnetic screwdriver to keep hold of the screws and help prevent the risk of dropping them in the back of the dryer.

STEP 2: LOOSEN THE STRAIN RELIEF SCREWs
Loosen the screws from the strain relief fitting—the fitting that secures the power cord to the dryer. Remove the power cord from the dryer.

STEP 3: DISCONNECT THE WIRES
After unscrewing each wire from its respective terminal, carefully pull the cord through the strain relief. Then, proceed to disconnect the neutral wire from the ground screw. You’ll typically find the neutral wire, which is often white, under the center screw of the electrical terminal.

Step 4: Connect the 4-Prong Power Cord
Insert the new 4-prong cord into the strain relief.
Connect the grounded (green) wire to the grounded screw or port and tighten.
Connect the end of the neutral (white) wire to the port under the center screw of the terminal block. Tighten securely.
Connect the ends of the black and red wires to the other two ports under the outer terminal block screws. Tighten securely.
Ensure the wires and the strain relief are securely fastened.
Retighten the strain relief, ensuring the cord is snug but not overly tight.
Step 5: Re-Attach the Cover Plate
Insert the cover plate over the wiring and secure it with screws.
Plug the power cord into the 4-prong outlet.


ARE DRYER PLUG ADAPTERS SAFE?
It is strongly recommended to refrain from using dryer plug adapters to connect to a 4-prong circuit. Instead, refer to your owner’s manual for instructions to switch to a 4-wire electrical connection to meet standard regulations and safety requirements. For questions or concerns about altering the circuit, consult a licensed professional for assistance.
Maytag® dryers
Gentle yet powerful drying action
Let your Maytag® dryer do the heavy lifting with parts and features that get the job done
SHOP FOR MAYTAG® ELECTRIC DRYERS
If you need an electric dryer equipped with a 4-prong cord, Maytag brand has you covered with reliable and powerful appliances, ensuring your laundry needs are met with ease.


Your subscription was successful
Thank you for signing up. Keep an eye on your inbox for our next newsletter.
Sign Up for More Insights to Stay Connected
Enjoy articles like this? Get helpful guides and appliance care tips sent straight to your inbox.
